I am on a mission... to create, to inspire, to learn, to educate, to save, to grow, to be better... Join me :)

Friday, July 6, 2012

10 minute home made strawberry ice cream without an icream maker!

So I was reading one of my Favorite Blogs the other day and she had posted about this "5 minute berry ice cream without an ice cream maker". I thought "hmmm I'm going to have to try that one day." One of the ingredients was heavy cream which I almost never purchase so I just added it to my "to try someday" file and forgot about it.

 A few days later I went to a local food distribution program and got all this heavy cream as part of a package deal.


So I decided to give the ice cream recipe a whirl!

I hauled out my trusty food processor (thank you swagbucks for helping me purchase this awesome kitchen tool!) 
I adapted This recipe a bit to make it easier for me and accommodate what I had available.

10 minute Strawberry Ice cream
Here is the Printable recipe

Ingredients:
4 cups frozen Strawberries, sliced, halved or quartered
1/2 - 3/4 cup of white sugar (adjust to your personal taste)
1/2 pint heavy cream (the cute tiny container)

Directions:
Add strawberries to your food processor.
Pour sugar over the berries.
Disclaimer: My pictures are not great for this post as I was impatient and it was super hot outside and I wanted to get this done and in the freezer ASAP! Also please ignore the weird stains on my very old counter tops. I have tried everything to remove them and they will not come off.

Pulse until the sugar and berries are mixed well and crushed pretty fine.

Slowly add in cream through the opening in the food processor. 
This part can get a bit frustrating if your processor is a smaller model like mine (it's and 8 cup vs. 12)  but if you take off the top and carefully move things around a bit with a wooden spoon (if you use a spatula you may cut it on the blade and if you use a spoon you could damage your blade) you will be all set. Turn on again and let it run until everything comes together. It will look all nice and slushy.
At this point you can put it in a container and freeze it so it gets nice and hard or you can serve it right away to you salivating children. I did both :)
This is what it looked like served right away
This stuff is AMAZING! I will say that I much preferred it after it had frozen solid. It scoops just like ice cream should and had a much nicer flavor I think after it had been in the freezer for 24 hours.

After serving this your family will definitely think you are the awesomest (yes it's a word, well today it is anyway) person in the whole universe!

If you find that you are getting lots of ice crystals next time stir your freezer mixture every 1/2 hour for a couple hours. It will help break them up.

Thursday, July 5, 2012

Fresh Picked Strawberries!

So last week the kids and I went out to a local farm to pick strawberries. I was super happy find a place that still had berries available because most of the local farms were already picked out. I had meant to go the week before but I was knocked out by one of the nastiest bugs I have ever had.

It  took us about an hour to pick all this...

I think the boy ate at least a pint and he definitely ate more than he picked. The girl did well picking, a bonus of her growing up a bit but she ate quite a few in the field too :) It was a gorgeous day and we had a blast.

The best part to me about this whole venture was that the kids did all the hulling!


Wahoo!

Yay me!

Thanks kids!


I then made approximately 20 pints of freezer jam... Phew what a day! Last year I managed to stretch the jam out all the way to the end of the school year. Hopefully I can do that again because the kids really love it. Last year I tried 3 different recipes and below is our favorite.

My Freezer Jam recipe. Here is the printable Strawberry Freezer Jam

4 cups of crushed strawberries
1 package of no/low sugar pectin
1/2 cup of honey (local is best)
1 1/2 cups sugar (next time I will try even less sugar)
1/4 cup water

Whir up your berries in a food processor or blender, then put into a heat safe bowl.
Add 2 Tablespoons of Pectin to the berry mixture.
Add rest of pectin to a medium saucepan with the sugar, honey and water. Bring to a boil for 1 minute. You just want to heat it up and get everything blended. Turn off heat and add sugar mixture to berries. Mix well to blend ingredients.
Pour into prepared containers. Let cool for a few minutes before adding lids. I let mine cool completely before I put them into the freezer.


I forgot to take a picture of my pile of finished jam but the bottom of my 10CU ft freezer is FULL!

The jam did not use up all our berries. I filled 2 trays of sliced berries to freeze (what I used for ice cream (recipe to come). We also ate lots with vanilla yogurt or put them on top of vanilla  ice cream. They were so huge and delicious it was well worth the work and effort!

Wednesday, July 4, 2012

Home made butter... mmmm

So I got a ton of Heavy cream as part of a food distribution program I went to... Hmmm now what?
Then I remembered a friend telling me she made butter last time she got a bunch of cream so I said to myself OK, I can do this!

There are lots of instructions online and luckily I have my trusty KitchenAid so I knew I could handle it. Still it's a bit daunting... I mean we don't make butter we buy it right? OK I'm over it lets give it a go :)

This was my favorite tutorial that I found homemade butter from The Hungry Mouse

Here are some pictures from my adventure...
 This is what it looks like after about 10 minutes and the nice fluffy whip cream is starting to break down.


Things go pretty quickly now and it gets clumpy looking.

 Now its ready for straining...


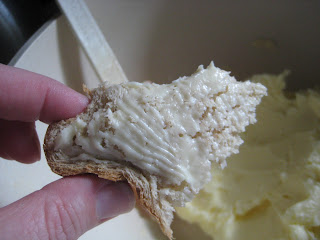
 This is after I have strained, kneaded, and rinsed out all the buttermilk. Sorry there are no in between pictures because my hands were covered in butter :) As an extra step I put the disc of butter into some sack cloth (you could probably use cheese cloth too) and folded it over and pressed to expel any remaining buttermilk. I also did mix in a bit of salt. Probably about 1/4 of a teaspoon.


 Mmmmm...


From 1 quart of cream I got 1 3/4 cup butter and over a cup of buttermilk we will use for pancakes or baking. I measured 1 cup into my handy dandy measure all cup and have a nicely measures cylinder to go into the freezer and wait until I need some butter for baking. If the heat ever breaks I will make some muffins and cookies .

So the ingredients I used were...
1 quart of heavy cream
1/4 teaspoon salt

handy tools:
A good stand mixer
a fine mesh strainer
flour sack cloth ( cheese cloth would probably work too)

Tuesday, July 3, 2012

How I've missed you!

So sorry for the huge gap in posts. Life has been crazy busy and I admit I just have not made the time to sit down and post what I have been up to. I am hoping to make up for it over the next few days and weeks. I have had some successes and failures in the kitchen and in the sewing dept.

What have I been up to you ask?

In May I was overwhelmed with... end of the school year activities & end of the year Girl scout activities including court of awards where my girls bridged to Cadette scouts. I just want to take a minute and say how amazing these 11 girls  are to me. Seems like yesterday they were in 1st grade and we were all getting to know each other. My how time flies!

The first 2 weekends in June I had outings with my Girl Scouts (the Zoo sleepover was AMAZING!!!) Also we had 2 scout events within our town that I helped organize. I have been running my almost 11 year old to drama camp and performances 2-3 times a week. Then I have been working on a sewing project that is due in a few days. I was commissioned to do 3 memory quilt wall hangings. This was a new type of project for me (even though I have done LOTS of quilts) It had its own particular challenges. All I have left to do is sew on the dedication and care tags and they are done!

Wednesday, May 9, 2012

A food obsession ?

Are you ever jonesing for a flavor and as you are making it or even thinking about it you feel like you can absolutely not wait to sink your teeth in. I mean your (my) kids could be screaming, the dishwasher overflowing, dog barking and all you can think about is savoring the numminess that is about to come. Then you get a glimpse of yourself and realize you may have a problem. Um yeah that's me... Hi I'm Paulette and I'm addicted to Avocados :)


I made this avocado chicken salad today and it definitely hit the spot. I hope you enjoy it as well!

Avocado chicken salad

Ingredients:
1 ripe Avocado
1 small chicken breast cooked & diced
1/2 lime juiced
1/4 cup finely diced red onion (about 1/3rd of a baseball sized onion)
1 tablespoon diced cilantro or to taste
salt to taste

Cut, peel and mash the avocado how to cut &peel avocados ( I do it slightly different but there are good tips here)
Dice cooked chicken & Onion & add to avocado mixture.
Add lime juice from 1/2 of a lime.
Add diced Cilantro and salt to taste.
Mix well

Serve on your favorite bread, croissant or in a wrap. Or you can be weird like me and eat it with tortilla chips :) or if you like just sit and eat it with a fork! Enjoy!