I am on a mission... to create, to inspire, to learn, to educate, to save, to grow, to be better... Join me :)
Showing posts with label make ahead. Show all posts

Thursday, June 30, 2016

Strawberry Freezer Jam... B2B inspiration


This is about 3 pounds of berries. We picked a total of 9 pounds

Yesterday The Boy and I went to pick strawberries at our amazing local (20 minutes away) U-Pick farm. There were other moms there with their smaller children and it reminded me of my first trip to pick berries with my children. Picking those berries and making jam was some of my first inspiration for creating this blog. So many people have no idea how easy it is to make something so simple yet ads such joy and satisfaction. Yes it was a bit more work but including picking it only took about 4 hours to make all this jam. I worked pretty slow since the berries were small and I let the boy off the hook from helping with the berries since (I needed his help in other areas around the house :)

I used Pomona's universal pectin this time. I like it because you can use less sugar.
I followed the recipe in the box for a cooked jam but instead of canning I put it in the freezer.


The Freezer Jam I have done in the past I made in this way.

The first batch I used 1/2 cup honey and 1/2 cup sugar. FYI the honey recipe will always be a bit more runny but my family is fine with it.

For the rest I use a Cane sugar I got from Aldi last week and it looks like it has jelled nicely.


YUM!!!

Saturday, August 8, 2015

Chili!

Written Monday August 3rd.  

Today has been a gorgeous day in central MN! The temperature and humidity has dropped, my hubby is home for the week and the kids have NO activities! Yes Triple bonus! With that being said I have been wanting to make Chili for a few weeks but it has been so darn hot that I just could not deal with cooking something low and slow all day (my preferred method for chili). Also my garden had this to offer today...


  Chili is one of those recipes I never make the same way twice. It is a very forgiving dish so feel free to experiment a bit. The hardest part of this recipe is cooking the ground beef. After that you add it all to your Crockpot and let it simmer for 4-6 hours on low.

get the printable version here... chili


Ingredients:
3 pounds ground beef browned and crumbled
2 small onions diced
1 can chili beans (I used mild)
1 can black beans
3 garlic cloves (run thru a press is best)
1 can diced tomatoes or 2 cups fresh diced. (feel free to add more or less to taste)
1 Tablespoon of chili powder (more if you like it spicy)
1 1/2 Teaspoons of paprika
1 teaspoon oregano
1/2 teaspoon garlic powder
1 Tablespoon cumin
salt and pepper to taste (I used about 1/2 teaspoon of each)

Instructions:
 Brown the ground beef in a large skillet and chop into fine crumbles as it cooks. Add Ground beef to a large Crockpot (5 quart MINIMUM!). Add the rest of the ingredients and let simmer on low for 6-8 hours.

Please taste at least 1/2 hour before serving. You can adjust any of the seasonings to suit your own tastes.

Also here are some things you could add to make it your own...
Diced Jalapenos
Diced bell peppers or any kind of pepper
Corn (I recommend frozen)
Diced zucchini
Diced summer squash

 Optional toppings:
Shredded cheddar
Sour cream
 
I served this with cornbread. You can find my favorite recipe here... golden sweet cornbread


   I have to say this was one of the best batches I have made in a long time and everyone agreed!

* Disclaimer!!! Every Crockpot is different! I used my large 8 quart Crockpot and it cooks super hot. I put it on high for an hour them backed it down to low for a few them left it on keep warm. If I was going to be gone for 6-8 hours I definitely would put it on low and maybe add a bit of water.

The best part about this dinner is we only ate half of it and even had half the cornbread left so I packaged it up and put it in the freezer for dinner another night when I don't feel like cooking! Yes, woohoo!

Putz factor... 3... yes there are a lot of ingredients but it does not take long to get them all put together. After it was all in the pot I really did not think much about it the rest of the day :)

Friday, July 26, 2013

OMG Bacon cheese burgers!


Most years my little family stays home on July 4th. We like to have a nice family day that includes some fireworks, fun and (hopefully Great) food. I try my best to cook our main meal over our fire pit especially since we built what I affectionately call my “redneck” grill.

Our menu looked like this:
Loaded baked potato salad
Green salad

Simple I know that’s why I try to bring something special to the table and this year I tried something new with our Burgers.

To start I diced about  1/3 of a red onion to yield about ¼ cup


Add salt and pepper about ½ teaspoon of each
Then I added some shredded cheddar I had in the freezer.
      (Note: in some of the pictures it shows a white cheese. That is because I forgot to take pictures of all the steps when I made them with Cheddar and When I made them the other day to freeze ahead all I had was mozzarella so I said what the heck, let’s give it a go!)

When you have all this mixed up  add  1.5 pounds of ground beef
         (Approximately an 80/20 blend. (I cannot tell you a specific fat content because we now get our beef from a local farmer and I do not know for sure the ratio at which the butcher grinds the meat/fat)

To make the patties more uniform I enlisted the help of my large stainless scoop. 

I scooped 1 portion, made a small patty then added a thin slice of butter, yes butter. 

This was a new one for me but I had heard the tip from a friend so I said “OK, why not” I mean its butter how could it be bad? The slice was about a teaspoon worth, or as thin as you can get from a cold stick of butter. Then add another scoop and continue to form your patty. 

Now the best part… wrap your patties with 2 slices of bacon. Mine is thicker and super smoky because along with the beef we just got our first whole pig so my bacon does look a bit more “rustic”


Now throw them on the grill!


When they are just about done top your burgers with your favorite cheese.
Don’t forget the buns! I splurged and got really nice buns and buttered them up and grilled them slightly before building our burgers. 


Top however you like!

We were very hungry by the time they were done so I do not have a good picture of the finished product :)
Ingredients:
 Red Onion
salt
 pepper
shredded cheddar cheese
1.5 pounds of ground beef
1 stick of Butter (not Margarine!)
Burger buns
Instructions:
Dice approximately 1/3 of the onion to yield approximately ¼ of a cup and add it to a medium mixing bowl. Add ½ a teaspoon of salt and black pepper. Add ½ a cup of shredded cheese. Mix these all up well then add your ground beef. Mix well to distribute flavors but try not to over work the meat as it can make the burgers more tough. I find using my hands is the best way to mix them well.
Scoop approximately 1/4th of a cup of meat mixture and make  a small patty then added a thin slice of butter. Then add another 1/4th of a cup of meat mixture to form your patty.

Wrap your patties with 2 slices of bacon.

For best results grill burgers outdoors.

When the burgers are just about done top your burgers with your favorite cheese.

Butter both sides of the burger buns and grill them till they are golden.

Top with whatever other toppings you like!

This is a very basic burger recipe that you can easily tweak to your own tastes.
You could add some Worcestershire, hot sauce, diced Jalapeños just about anything.
My family loved them and I am making them for my daughter (at her request) and her friends when we celebrate her birthday tomorrow.

Wait till I tell you about our Desert!

Thursday, October 25, 2012

A whole lot of Breakfast Burritos

I Love Breakfast Burritos! I have since my single days when McDonalds first started serving them and for me they were the best cure for a lat night out on the town. Now as a busy wife and mom they have become a great way to start the day for my busy family.

Today I kept track of how I make them.
Printable recipe

I used:
1 pound of breakfast sausage (I got mine at Aldi)
1 onion diced
1 bell pepper diced
18 eggs
1 cup of milk
1 cup of shredded Cheddar cheese
salt
pepper
American cheese slices 12-24 depending on how much cheese you like
24 10 inch flour tortillas

Using a large nonstick skillet Cook and finely crumble the sausage. Add the diced onion. cook for a few minutes till it starts to soften. Add the diced bell pepper cook until it begins to soften a bit.

Whisk eggs and milk together well. Add to the sausage mixture. Add shredded cheese and stir it all around. Add salt and pepper to taste, but go easy on the salt because the cheese will add saltiness. Cover and cook on low stirring occasionally to get nice fluffy eggs and a nice scramble.

When the eggs are cooked I let everything cool a bit. Warm the tortillas in the microwave for 20-30 seconds to help them be soft and pliable. lay 1/2 to one whole slice of cheese on a tortilla closes to the edge toward you. Put 1/2 - 2/3 cup of egg mixture on top of cheese. Roll the tortilla starting with the edge closest to you by folding up from the bottom, fold over the left and right side then continue to roll. Wrap tightly with plastic wrap and store in a zip top freezer bag. continue until all are rolled.

There are two ways to reheat your Burritos.
Quick method: unwrap and  microwave for 1 minute at half power. Warm a bit more if you need to.

Oven method: (My husband's personal favorite) Unwrap and place Burritos on a baking sheet. (for easier clean up lay down a sheet of Parchment paper or use your silpat mat. cover with your favorite cheese and bake at 350 for 20 - 30 minutes or until burritos are warmed through. if you do not like your cheese crispy bake for 25 minutes with out the cheese and only add the cheese at the end until it is melted.

Yield 20-24 burritos

I forgot to take production pictures because frankly I was super hungry and I just wanted to finish so I could sit down and eat some :)

Here is one bag of the finished product. (I have 3 bags total now that I am done)


Thursday, September 6, 2012

Easy Peasy School Lunch ideas

Ok so in my community there has been lots of talk and work to improve our lacking school lunches. "The Boy" would get school lunch almost every day just because he just likes to get lunch at school but does not always eat it all. "The Girl" is the opposite but is liking the salad bar at her new school. Most days they bring lunch from home. Yes I do pack it for them in the morning but you could pack it the night before or do enough for the week on Sunday evening. Here are some ideas...

(EDIT January 2014)  Our School lunches have improved a lot since my original post. Is there still room for improvement? Yes, but now my kids eat school lunch more often than not. Partly because I am working part time now and also because it is a choice we have made. I am leaving these ides here in hopes to help other moms who are struggling with choices :)

Sandwiches... OK this is a no brainer but "think outside the bread" :)
Meat and cheese roll-ups... roll favorite lunch meat with cheese and secure with a toothpick
Meat and cheese cut into shapes... I don't have the time and patience for this but some kids love it and it helps them be more adventurous.
Crackers ... add with cheese and meat and you have home made Lunchables!
Leftovers... anything that can be eaten cold, IE: Pizza
Frozen grapes... My kids LOVE these. I buy lots when they are on sale wash take off the vine and freeze.
Home made muffins ... freeze them! they will be perfectly defrosted by lunch :)
Freeze yogurt cups  ... this was a revelation to me! My kids love it and it's like they get ice cream with lunch! You can freeze the individual cups from the store or buy the big tubs and make your own.
Apple sauce ... make your own and freeze like the yogurt! Or buy the super size jug at the store and portion it out into your own containers.
Cut / wedged Apples ...  There are a few ways to keep them from browning... drizzle any citrus soda you have over them. I have been using a lemon lime soda from Aldi it's about .89 for 1 liter. Or wedge then wrap tightly back into it's shape with a rubber band or plastic wrap. The surfaces won't be exposed so the sugar will not oxidize as fast turning it brown. Use less sweet varieties, they brown slower!

 I will be adding more to the list but this is a start.

I also want you to know that I used to only think I could put pre packaged snacks and goodies in my kids lunch. It is only over the last few years I have begun to get more creative with their lunches.

See my all about lunch page for some pics of my kids lunches

Wednesday, July 11, 2012

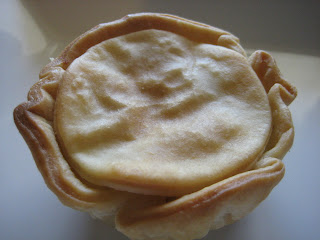
Mini Chicken Pot Pies...

A while ago I made a ton of pot pie filling and after making 2 large pies still had dough and filling left so I decided to try making Mini's and freeze them to cooking later.

Please disregard my awful looking muffin tin, yes it has seen better days but I think it's at least 15 years old and has seen a lot of use :)


I lined my muffin tin with my silicone baking cups just to make my life easier later. Froze them solid then placed the frozen mini pies into a zip-lock bag. 

Yesterday I decided I wanted the kids to have something other than PB&J for lunch so I baked these up. 

The verdict... Awesome! The kids really liked them and if you let them cool a bit you can eat them with your fingers. I baked them at 350 for about 25 minutes.

No I know you are probably looking for a recipe after me posting all this but I have a confession... I never make my pot pie the same way twice. I can give you an idea of what I put in it but thats the best I have for now :)

Chicken Pot Pie filling
Pie crust for a 8-9 inch 2 crust pie Here are links to some I have used and liked or you can use store bought. buttermilk pie crust   Perfect Pie Crust courtesy of PW
Diced Cooked chicken, 2-3 breasts worth
Assorted vegetables (whatever you like)
     Corn, onion, peas, potatoes cubed or diced fine.
1 can / serving of cream of something soup (chicken, garlic or onion are great) Store bought is fine or home made if you have it. Here is a basic recipe.
Salt 
Pepper
assorted dried herbs up to a teaspoon or 2, I have a rosemary blend I like.
milk or cream to thin out the mixture about 3/4 cup

Mix everything together in a bowl

For large pie ...Line your pie dish with bottom crust, add filling, add a bit of water with fingertips to rim of crust add top crust. finish edge of crust with your preferred method. I like to flute the edge with mu fingers. Bake at 350 for 45-60 minutes.

For mini pies use a large biscuit cutter (about 3") and put dough circle into muffin tin. Fill tin 3/4 of the way with chicken mixture. cover with a smaller disk of dough. (A set of cutters like these come in handy I have This exact set )

I totally winged these directions, like I said I never do it the same way twice. Luckily pot pies are pretty forgiving and if you do not add enough seasoning a bit of salt works great at perking it up.

Have fun!

Saturday, March 31, 2012

Banana muffins and a tip for serving them to your family hot out of the oven first thing in the morning

My hubby had to be up and out early this Saturday morning to help with our district Pine wood derby so I wanted something hot for him and the kids. So I made Banana muffins.


Sorry the picture kinda stinks. It was early and my brain was not yet fully functional and I had not yet had coffee :)


Now I know what you are thinking... How did you whip those up at such an early hour? Well the trick is I had made the batter a few weeks ago and froze it in the muffin wrapper! Yes you can do that!

First here is the recipe I used... Banana muffins It is similar to the recipe I grew up with but it uses melted butter instead of shortening (Bonus if you ask me!) Line your muffin pan with liners (paper or silicone) Fill 1/2 to 2/3 full (I tend to under fill when I am going to freeze them. I feel they bake better). A metal scoop works great for this! and pop into your freezer. After they are frozen you can remove them from the pan and put into a zip top freezer bag.

When you are ready to bake put the # of muffins you want to  bake back into a muffin pan, put it into your oven  and turn it on to the desired temp. Bake for the normal time knowing you may need to bake them a few extra minutes but do the toothpick test to be sure (insert a tooth pick into the center of muffin and if it comes out clean it is done.)

Hubby really liked these. He said they were moist an yummy and the Girl liked the slight crispy-ness on the top.

Oh and I was extra nice and made hubby an egg sandwich while the muffins were cooking. So if you see him today and he is in an extra good mood... you are welcome... :)